
One of the tough parts about any hobby is figuring out what to do with your equipment and supplies. In this blog, I’ve been discussing how to scrap without buying a lot of supplies at once. But the supplies you HAVE to have, and in some quantities, are
- Photos
- Scrapbook pages
- Scrapbook paper
Today, I’ll share some of my simple solutions for storing these items safely so you can easily access them for scrapbooking. Please note that I do not work for or receive any compensation from any of these companies. I’m simply sharing what I’ve found that works for me.
Photos
My absolute “go to” for photo storage are cardboard photo boxes. You can get them 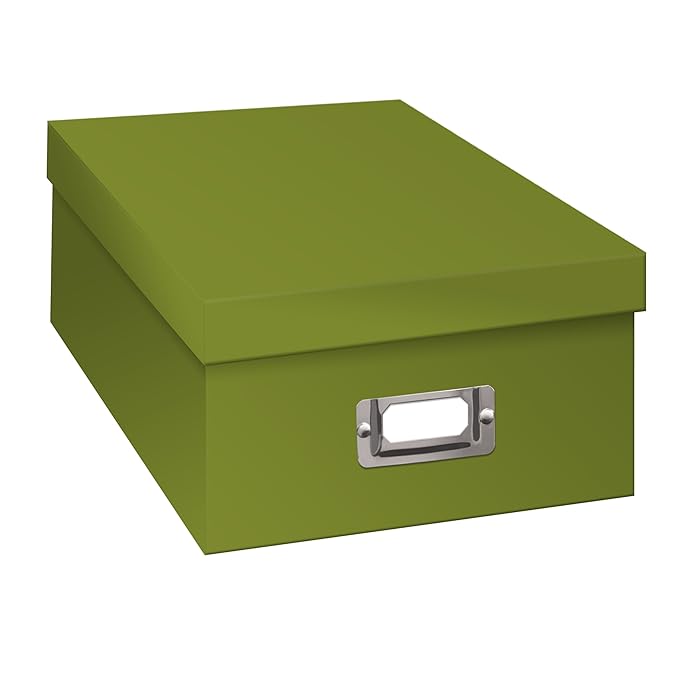 ANYWHERE: Michaels, Amazon, Target, Jo-Ann Fabrics, Container Store, Walmart, etc. Be sure they say “acid free.” You can get them in an array of colors and patterns so have fun with that! And the great part is you can use them for lots of things: photos, memorabilia, embellishments (stickers, etc.), supplies, etc. They stack nicely, have a labeling slot so you can re-label them easily. You can use them over and over each year or project. Or you can store pictures in them for long term storage. My only warning is to NEVER, EVER pay full price for these. They go on sale regularly. I usually get them at Michaels for $2 on sale; they are regularly $6-8 each.
There are other photo organizing options such as plastic bins, but I am happy with my cardboard boxes. They are acid-free and protect my photos from light. I fill them with heavy pictures and have never had one break, crack, or buckle. And I figure the world has enough plastic already so I’ll use cardboard where I can.
Scrapbooking Paper and Pages
This is where storage options get a little tougher. If you make 12 x 12 albums, both items are “oversized” for nearly all office storage boxes (which are made for letter size or legal size), so you need a storage box or bin designed for scrapbooking. Fortunately, there are some reasonable options.
The shipping box: If you order materials from Creative Memories, Scrapbooking.com, Amazon, Echo Park or some other vendor and are lucky enough to receive a box that perfectly holds 12 x 12-inch items, keep it! It can serve you as an organizer or storage box for your materials when you are starting out. I would worry about long term storage. Nothing says the cardboard is acid-free so think of these as temporary housing.

Clear plastic cases: OK, I said the world has enough plastic but these are NOT throwaways. In fact, I’ve never had one break in 20+ years of scrapbooking and I use the same ones over and over. These hold scrapbook pages, paper, embellishments, etc. without bending. Note that for some scrapbook pages you may need to turn them 90 degrees…the inside is not completely square.
I also use them to store memorabilia, journaling notes, etc. for each year until I have the album done.
Like photo boxes, I always buy them on sale, usually for $4 or less at Michaels.
 \
\
Shelves for paper: These are very handy, but they are not my favorite. Unless you build a cover for them, they are open to dust and light. But they are very easy to use, come in an array of styles and prices, and you can usually stack them to increase your storage options.
Next steps?
When you collect more items than are easily handled by a couple of boxes and bins, here are some easy expansions…and some down-the-road dream products.
 An Iris 6-case scrapbook cart: One of my first storage purchases! I had a box for scrapbook pages, one each for patterned and plain papers, one for stickers/embellishments, one for 8.5 x 11 paper, and one for the project I was working on. And it was on wheels! I have rolled it all over the house and into many scrapbook weekend events. It is moderately sturdy but needs a little TLC since I fill those boxes with heavy paper. Standard price is about $34 but you can often find them on sale at Target, Michaels, Walmart, etc.
The downside? Because the drawers are clear, the cart doesn’t protect paper from light damage. But I came up with a fix for that. I folded an inexpensive light-blocking curtain panel lengthwise and stitched along the fold (not a sewing person? Hot glue gun or Stitch Witchery would work fine). Then I used some Velcro strips to make my “wrap skirt” stick to the rim. Voila! A light protective wrap that easily opens when I want to use the drawers! Cost: About $10.
A lateral filing cabinet: I called a used office furniture shop to see if they had a used two-drawer lateral filing cabinet. If I bought it new? $400+ but used was $100. And it holds ALL my scrapbooking supplies and equipment. Hooray! Even better, it gave me more surface area to spread out when I’m scrapping! If you get one, be sure to measure the inside drawers to make sure they are 14 inches deep.
Down-the-Road Dream Products
Bookcase with adjustable shelves: Again, try a used office furniture store. New $129 but you may score one for half of that if buying used. Great for storing your albums, photo boxes, etc.

ScrapRack: This was my Christmas wish a few years back that Santa Hubby made come true! It is a flip rack for your paper, embellishments, etc. I love, love, love it. But it DOES take space. I put it on top of my filing cabinet. And how do I protect that paper from light? I use the other light-blocking curtain panel left over from my cart wrap to drape over my paper when I’m not using it. You can find ScrapRacks at Totally Tiffany.

I must also comment that the Totally Tiffany folks are wonderful at customer service. I lost a connector piece at one point. I called to ask how to order it and they sent me one for free. Years later one of the Spinders (notebook style binder clamps that hold the paper) pulled away from its Velcro backing. The company instantly replaced it.
And if you want to really get crazy, check out the WorkBox 3.0… It doesn’t suit my scrapbooking style but it’s a great idea!

How do you store your paper? Please share!
Happy organizing!
Marsha
