Bash Your Scraps Resources

  • “I always have leftover stickers.”
  • “What can I do with all these mats in the mat pack?”
  • “I love this paper…I can’t just throw away the scraps!”

I love getting a new pack of paper, stickers, or embellishments. And I use the ones I think are SO pretty or that are part of a layout I’m copying from a great designer. But I end up with a LOT of “leftovers” that are too nice to pitch. 

Every year I run at least TWO free Zoom Crops to demonstrate great ways to use up those scraps to make 1–2-page layouts, borders, embellishments, etc. My goal is ALWAYS to teach METHODS that you can use over and over again to make your scrapbooking both fun and easy and to use all those great products you invested in.

On this page, I’ll share some great videos and resources for using up paper scraps, stickers, embellishments, etc. 

Left-over stickers video: This is an old idea made new! MY HINT: save the non-stick backing from a sticker sheet. Arrange your stickers on it…you can move them easily. When you like the arrangement, just transfer each sticker to the same spot on your page or paper strip. 

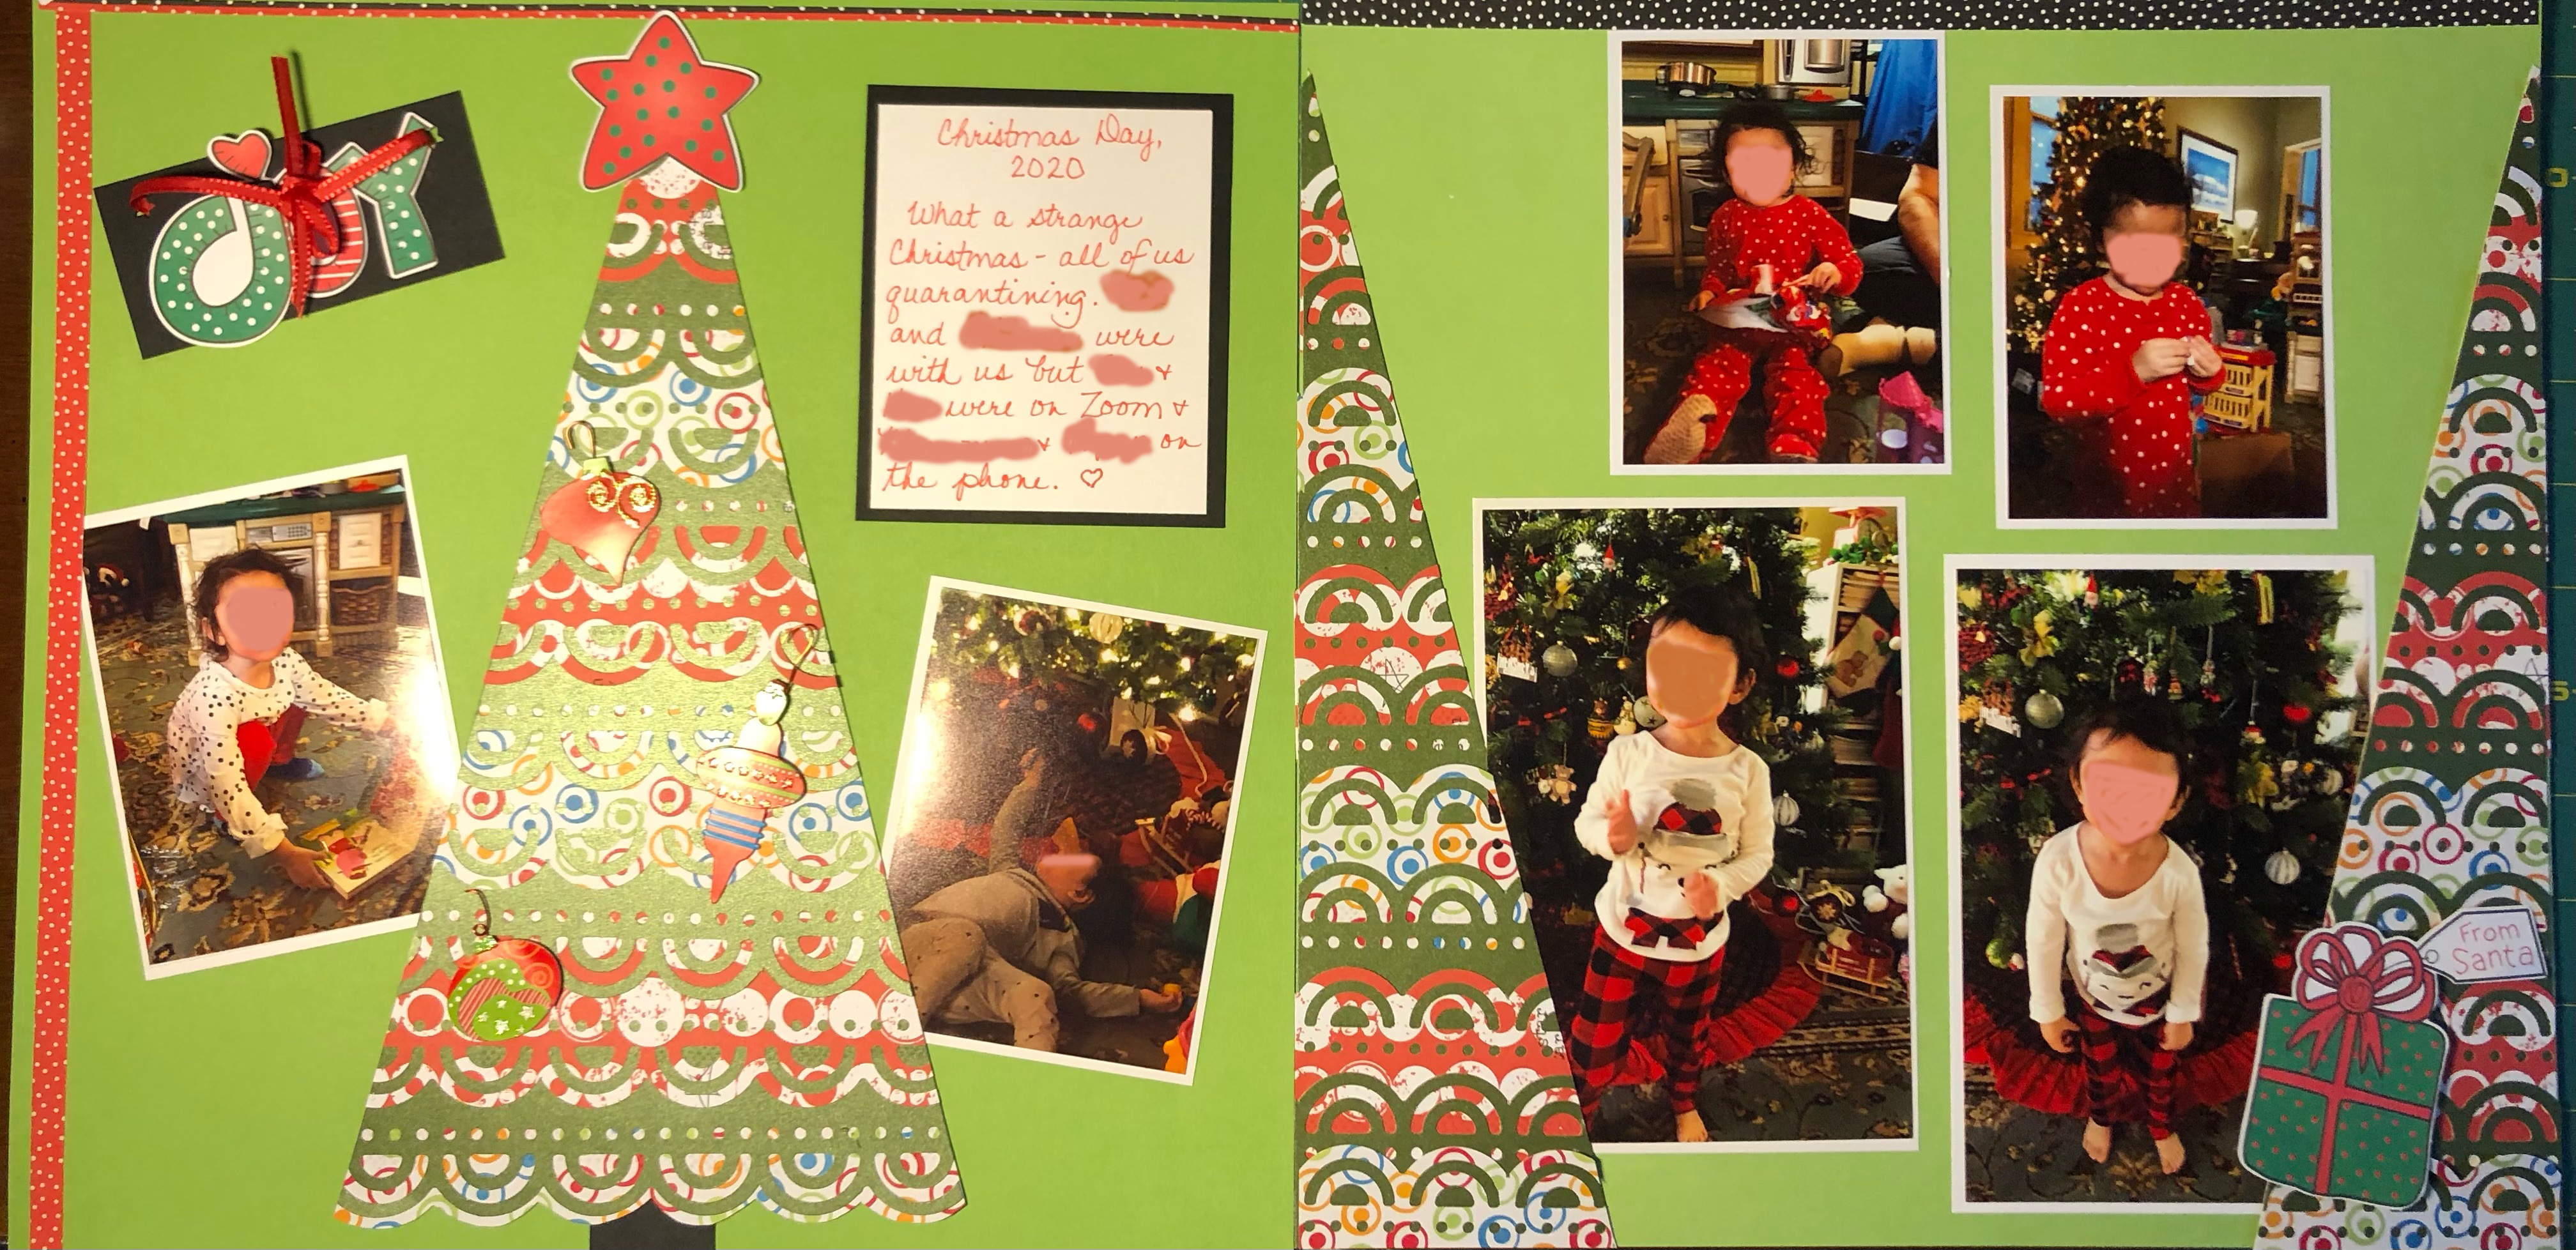
CM Variety Mat Pack Hack: I ALWAYS have left over mats from mat packs. This great strategy turns them into pages with four mats ready for pictures, a title block and a journaling block. Add pics and a few embellishments…DONE!

Finishing Off a Collection: Diane Gutierrez makes great use of left-over scraps! MY HINT: Noreen Smith’s 1-2-3 layouts (see Organized and Creative Mom) are great for using leftover paper scraps, too. A 1-2-3 layout uses one sheet of two-sided paper and three cuts to create 2-page layouts on cardstock. BUT the 1-2-3 layouts clearly show the exact size of pieces you need to make 2-page layouts so you can use the diagrams along with your scrap sizes to create great layouts while bashing your scraps!

I recently held one of my biannual Bash Your Scraps Zoom crops. We used all three of these videos. Check out a few of my samples below.

This Bash Your Scraps layout used left-over papers, mat pack, and embellishments from the Creative Memories Emerald Gemstone collection. The border on the left is layered designer paper strip + two laser cut border strips. The Bold and Beautiful mat pack title card is mirrored on the bottom with a large mat of similar paper cut down to 4×6. The leafy mat on the right-hand page (left column) is lined to serve as a journaling box. The two mats on the right are mat pack leftovers. The embellishments are from the sticker pack. This layout will hold 5 4×6 photos and two smaller photos.

This layout bashed my stickers! I had these CM stickers for a long time, but no paper to use with them. I used pink shimmer background paper. Before adding stickers to my paper, I arranged them on an old sticker backing paper. Worked great! I worked out the spacing both vertically and horizontally. The green border is a single strip of CM Ruffle Trim Border Maker punch and the green border on the right-hand page is a strip of the CM Garden Ruffle punch. I was so happy to be able to use all those great “word” stickers along with the flowers. I have just a few tiny accent flowers left…I’m keeping that strip with this layout. When I add photos, the last of the tiny flowers fill get added among the photos.

These were done using ONLY mats and embellishments added to a background sheet that is completely hidden by the mats. Note that the left page has a title, a journal box, and room for four horizontal photos. By trimming the 4×6 photos by 1/4 or 1/2 inch on the long and wide edges, my photos will be automatically matted by the great mats behind them. The right-hand page is similar but set up for vertical pics. Note that the words on the top left and bottom right mats will be covered up by photos. Again, this has room for four pics along with the title block and the journaling block. I was able to use up many of my left-over CM summertime mats! And each page took less than 15 minutes to make include embellishments!

I hope you will try some of these great methods for using your bits and pieces! It’s really satisfying to finish a paper or embellishment pack!

Know another good way to use up scraps? Please share it in the comments below! Thanks to all the artists online, on YouTube, and at my Zoom crops for sharing your creations! Please follow my Facebook page so you know when the next Zoom crop will be. They are always free and always fun! And, of course, if you need Creative Memories supplies, please support the Scrappin’ Circle by ordering through my page. Thanks!

Happy Scrappin’!

Marsha Matyas

Trees, Trees, Trees

Trees have so many meanings in our lives…
…Christmas trees are magical with their twinkling lights and ornaments we add each year.
…Fall trees herald the change of the seasons, with beautiful colors and the rustle of leaves beneath our feet.
…Palm trees remind us of warm breezes, sand between our toes, and a cool dip in the water.
…Flowering trees tell us that the icy winter has gone, and summer is on its way.

Trees can also be beautiful components of our scrapbook pages, cards, or journals. At a recent Zoom crop, our Scrappin’ Circle tried making several kinds of trees. Today, I’ll share ideas, resources, and links so you can join in our tree-rific crafting!

Looking for the Perfect Pine

Bev DeBono Christmas Tree: Bev DeBono always has great ideas for creating simple but beautiful pages and embellishments (check out her Facebook page). She crafted a beautiful, tiered pine tree (left) from strips of paper decoratively punched on one edge. And the big bonus…you can make ANOTHER tree from the part you trim away. Watch the video and then see my synopsis below.

Video link: https://www.facebook.com/bevdebonodesigns/videos/327385956059331

  • Materials: Background paper (2 sheets), two or three coordinating one-sided papers (or two-sided) to make the tree, smaller pieces of paper for trunk and star (optional), the Cloud Border maker cartridge or other edge punch, 12” paper trimmer or ruler and scissors, and adhesive – preferably repositionable.
  • Punch a 12” long strip with the cloud border maker cartridge then trim the paper to 2” wide (e.g., a 12” x 2” strip with one long side punched with the cloud punch). Repeat this so you have FIVE punched strips of two coordinating colors of paper (3 of one color, 2 of the second color. The one with 3 strips will be at the top of and bottom of your tree). Cut all five strips in half at 6”so you have TEN 2” x 6” pieces. You will only use nine of the ten pieces.
  • Line up the first piece on the bottom of your cutting mat. Line the next one up on the 3” mark as shown in the video. Use repo tape on bottom of cut edge. Repeat (line up next pieces at 4”, 5”, etc.)
  • When you have 9 layers, make a mark at top of the stack of paper in middle (3” mark)
  • Cut tree with your trimmer on the diagonal from the 3” mark to each bottom corner to create a triangle tree. Decorate with trunk, star, decorations, etc.
  • The remaining tree pieces can be used for a double page spread! They can be half-trees adhered to the edges of the second sheet of paper OR you can fuse them together to form an entire second tree.
  • Check out the trees we made at our Zoom crop! Thanks to T. Perper, M. Yearsley, and M. Matyas for sharing their creations!

Folded Circles Pine Trees

These are great little trees that take only minutes to make AND you can make them any size you like! Make some small ones and some big ones to create a corner “forest” on your page! Take a look at the video:

The great part is that you don’t have to have any special equipment to make them. You can use a circle cutter such as the Creative Memories Custom Cutting System (CM-CCS) or the new Circle cutter. If you still have a compass in your drawer, you can draw circles of varied sizes and cut them out. Or you can grab a few jars, cans, and bottles to trace and cut. Add a trunk, a star, and some gems for an indoor tree or some snow for an outdoor tree.

If you are using the CM-CCS, see tips in the picture below. Also note, use the corner of a page to line up the half circles so they are at right angles (90 degrees) to each other for a uniform look.

Check out the beautiful window frame layout made by L. Hubbard which incorporates the Bev DeBono tree, the circle tree, AND CM tree punches. Lovely!

To make a circle tree using the new CM Circle Cutter, see this video:

Palm Trees

Meggan Jacks always has great ideas for layouts and embellishments, including the lovely palm tree at left. (Be sure to check out her YouTube videos and her Facebook page). She used the CM Gum Leaf Punch (on sale now for $15!). Watch the video below to learn how to make this great tree!

Other punches that would make nice palm tree leaves include the flame from the Campfire Punch (on sale now for $15!) and the stems and leaves from the Five Leaf Punch. And, of course, the wonderful pack of tropical leaves in the Vitamin Sea Embossed Embellishments ($10) will make great palm trees and tropical plants! What leaf punches and stickers do you have? If they will hang upside down nicely from the top of a tall, narrow trunk…you have a palm tree. Hint: Punch a few small brown circles for coconuts at the top of the tree and on the ground.

The Love Tree

This is a whimsical tree perfect for wedding or engagement pictures, Valentine’s day, Easter Egg tree, Autumn Leaves Tree, Mother’s Day, May Day, or any other time you want a lovely floral setting. Is there ONE way to make it? NO! As you watch the video, you will see the artist cut and place narrow slips of paper to build the branches the way s/he wants them. Take a look at a very creative bit of artistry!

I made a drawing of the trunk using my CM Jumbo Circle as a guide (see above). You can do the same with any large circle (e.g., a dinner plate) or create a trunk that you like. For branches, you can cut snippets as the artist in the video did. I also punched a few branches using the CM Branch Border Punch (see left).

How to decorate the tree? Your choice! The artist cut little hearts from folded paper, giving the hearts a 3D effect on the tree. I chose two colors of paper and cut out lots of single-cut flowers on my Cricut. I also used fabric flowers from Michaels. And, of course, you can add beautiful Easter eggs or autumn leaves.  

Here is another artist’s rendition of a flowering tree…lovely!

Share Your Ideas!

Hope you enjoyed our “tree-rific” trees. Know another good way to make trees? Please share it in the comments below! Thanks to all the artists online, on YouTube, and at my Zoom crops for sharing your creations! Please follow my Facebook page so you know when the next Zoom crop will be. They are always free and always fun! And, of course, if you need Creative Memories supplies, please support the Scrappin’ Circle by ordering through my page. Thanks!

Happy Scrappin’!

Marsha Matyas

Corner Rounder Roundup Part 4: Make Flower Embellishments

This is the third blog in series on using the humble corner rounder to do more than trim the edges of your pictures. Be sure to look at the first three blogs for both techniques and layout ideas.

Part 1: Using the Corner Rounder for Simple Borders

Part 2: Using the Rounded Square for Fabulous Layouts

Part 3: Make a Mandala Burst Layout with Rounded Squares

First, I want to give credit where it is due. These ideas were not developed by me but were kindly and publicly shared by their creators/designers. See below for those credits AND links to original sources. My contribution was to gather these corner rounder ideas together as a group.

In the last blog, you learned how to make a beautiful Madala Burst layout with Rounded Squares (a square rounded on two corners). See below.

Rounded Square

Today, I’ll share another wonderful design that you can make using Rounded Squares. This is a “oldie-but-a-goodie” shared via a Creative Memories video. Materials note:  For ALL the Corner Rounder Roundup projects, you can use:

  • Any corner rounder. You don’t have to have a two-way corner rounder that also cuts indents on corners.
  • Either two-sided or one-sided printed papers.
  • Printed papers or thin cardstock except as noted.
  • SCRAPS! Use them up!

CREATIVE MEMORIES CORNER ROUNDER FLOWERS

  • Pick your papers carefully. For your middle layer, consider using a light print or tone-on-tone paper. Three busy prints can make the flower a bit “confusing.”
  • You CAN use very lightweight cardstock but you must be able to fold it and unfold it without the surface showing cracks or permanent creases.

Materials: You will need the following:

  • Three circles of paper of various sizes. Note that your finished flower will be the size of your largest circle so plan accordingly. Also, if your circle is very small (e.g., less than 2″ or 2.5″) you will have trouble using the corner rounder to cut the petals.
  • Embellishments such as gems, insect punches, tiny flowers, etc. for the center and leaves for underneath, as desired.
  • Foam squares (optional)

STEPS

  1. Be sure to watch the video first.
  2. As shown in the video, for each circle, you will fold it in half and punch the two folded corners. Then you repeat this four times, folding the flower in half and rotating so you end up with 8 “petals” around the outside of your circle. Unfold but do not try to completely flatten the paper.
  3. Stack the layers, with the largest on the bottom. Adhere each with either adhesive or foam squares in the CENTER of the piece, leaving the edges free.
  4. Adjust the “petals” as desired, slightly folding some upward to give your flower depth.
  5. Add embellishments (see picture below). Your flower needs a “center”…how about a blingy crystal or pearl stick-on, a circle of a matching paper, a lovely bee or butterfly, or other embellishment? Also, consider adding a leaf or two under the bottom petals on one side to break the circle and provide more visual interest.

Some ideas:

  • Want a two-page spread? Make an extra half flower and bee and use them to accent in the opposite corner.

LAST NOTES AND INFO…

  • If you make one of these layouts, please take a picture and share it below!
  • Many thanks to H. Northcott and T. Perper for sharing their examples above.
  • If you need supplies or tools from Creative Memories, I would be delighted to assist. You can order easily through my link: https://www.creativememories.com/user/MarshaSC .
  • Want to attend my next virtual crop? They are FREE! Be sure to follow my Facebook page (Marsha’s Scrappin’ Circle) or send an email to me to be added to the email list so you get early notice!
  • Need help with an order or more info about a crop? Contact me at marshamatyas@gmail.com.

Be safe, be happy, and…be scrappy!

Marsha

Corner Rounder Roundup Part 3: Make a Mandala Burst Layout with Rounded Squares!

This is the third blog in series on using the humble corner rounder to do more than trim the edges of your pictures. Be sure to look at the first two blogs for both techniques and layout ideas.

First, I want to give credit where it is due. These ideas were not developed by me but were kindly and publicly shared by their creators/designers. See below for those credits AND links to original sources. I encourage you to “follow” these amazing designers at their websites or Facebook groups. My contribution was to gather these corner rounder ideas together as a group.

In the last blog, you learned how to make a beautiful layout with Rounded Squares (a square rounded on two corners). See below.

Rounded Square

Today, I’ll share another wonderful design that you can make using Rounded Squares. Materials note:  For ALL the Corner Rounder Roundup projects, you can use:

  • Any corner rounder. You don’t have to have a two-way corner rounder that also cuts indents on corners.
  • Either two-sided or one-sided printed papers.
  • Printed papers or thin cardstock
  • SCRAPS! Use them up!

KARYN McDERMAID-ROLFE MANDALA BURST-INSPIRED LAYOUT

Karyn creates beautiful layouts and kindly shares them at her website, Facebook page, and at the Creative Life Facebook page. If you love what you see, join her Facebook group and the Creative Life group! Karen created a beautiful layout and shared her how-to’s at the Creative Life Facebook page and YouTube. I’ll share some directions below.

  • Pick your papers carefully. Large prints may not show up in a 1.5” square or 1” square. Small patterns or tone-on-tones such as those at left work best.
  • You CAN use lightweight cardstock to cut the smaller pieces if desired.
  • Directional patterns require additional cutting and layout steps. See Karyn’s excellent video for step-by-step directions on how to cut out the Rounded Squares from directional paper.

You will need the following:

  • 1 sheet of 12” x 12” background paper A
  • 1 sheet of 12” x 12” background paper B OR four 12” x ½” framing strips from background paper B
  • Fourteen 1”x1” squares of paper C (gold pieces in example)
  • Fourteen 1.5”x1.5” squares of paper D (rust/orange pieces in example)
  • Fourteen 1”x1” squares of paper E (green pieces in example)
  • One circle (F) for center photo mat.  (Use smallest Custom Cutting System circle with green blade on outside. To cut photo, use same CCS circle with red blade on outside).
  • Embellishments and journal box as desired

STEPS

  1. For pieces C, D and E (42 in all), use the Circle Rounder to trim TWO OPPOSITE EDGES on each piece (see diagram at right). Remember to empty the waste bin on your Circle Rounder after finishing each color group. As Karyn points out in her video, if you don’t, it can affect your cuts.  

2. Use the fine tip of a journaling pen (e.g., black, navy, dark green) to draw an outline on each of the 42 Rounded Squares. They do not have to be perfect. The lines give depth to your layout. See also Karyn’s video directions.

3. Trim ½” off the top edge and one side of background paper A. Resulting piece is 11.5” square.

4. Create frame one of two ways. 1) Adhere background paper A to 12” x 12” sheet of background paper B OR 2) Adhere the four strips of background paper B to the back of background paper A so that ¼” shows on each side on the front. Your whole page should be 12” x 12” square.

5. Find the center of your 12”x12” layout and adhere the circle (F) in the center using repositionable tape. Check to make sure it is centered in both directions. A centering ruler can help. Adjust as needed. This is important…if your circle is off center, you will run out of room on one of your edges when you layout out the Rounded Squares.

6. Arrange the fourteen C pieces around the circle with the points facing toward the middle and outside. See diagram above for position. It’s important to get these positioned evenly because all the other pieces will be placed based on this inner ring. Adhere with repositionable tape runner.

7. Arrange the fourteen D pieces as shown in Karyn’s example above, with their inner point positioned between the C pieces. Adhere with repositionable tape runner.

8. Arrange and adhere the E pieces between the D pieces as shown in Karyn’s example above. Note that you may extend over the page border at the centers of each side. However, don’t extend over the edge of the page.

9. Check your pattern and adjust as needed.

10. Add center photo and embellishments. You can use bits of border punches, layered embellishments, stickers, flowers, journaling boxes, or other embellishments.

Some ideas:

  • This would make a great title page (engagement, birthday, anniversary, vacation, annual album, etc.)
  • Some of the Rounded Square can be photos! Look at the great golf example above by H. Northcott. Consider putting face shots in some of the spots.
  • Want a two-page spread? Make a few extra Rounded Squares and use them to create a partial “burst” in the opposite corner.

LAST NOTES AND INFO…

  • If you make one of these layouts, please take a picture and share it below!
  • Many thanks to H. Northcott and T. Perper for sharing their examples above.
  • If you need supplies or tools from Creative Memories, I would be delighted to assist. You can order easily through my link: https://www.creativememories.com/user/MarshaSC .
  • Want to attend my next virtual crop? They are FREE! Be sure to follow my Facebook page (Marsha’s Scrappin’ Circle) or send an email to me to be added to the email list so you get early notice!
  • Need help with an order or more info about a crop? Contact me at marshamatyas@gmail.com.

Be safe, be happy, and…be scrappy!

Marsha

Corner Rounder Roundup Part 2: Using the Rounded Square for Fabulous Layouts!

This is the second of a blog series on using the humble corner rounder to do more than trim the edges of your pictures. In March 2021, Scrappin’ Circle friends from the U.S. and Canada joined me for a Zoom crop where we focused on using a corner rounder punch (CRP) and paper scraps (bash your scraps!) to create layouts, borders, and embellishments. I received lots of requests to share what we did, so I’m writing several blogs with directions so you can make them, too!

First, I want to give credit where it is due. These ideas were not developed by me but were kindly and publicly shared by their creators/designers. See below for those credits AND links to original sources. I encourage you to “follow” these amazing designers at their websites or Facebook groups. My contribution was to gather these corner rounder ideas together as a group.

In the last blog, you learned how to make a Rounded Square (a square rounded on two corners). Today, I’ll share a wonderful layout that you can make using Rounded Squares.

Materials note:  For ALL the Corner Rounder Roundup projects, you can use:

  • Any corner rounder. You don’t have to have a two-way corner rounder that also cuts indents on corners.
  • Either two-sided or one-sided printed papers.

MEGGAN JACKS’ CORNER ROUNDER LAYOUT

Meggan Jacks is a wonderful scrapbooking designer and trainer. She graciously shares some free designs through her Facebook page and website. If you love what you see, she offers a membership in her “insiders” group where you can get PDFs of weekly designs, etc. Click here for details.

She created a beautiful layout and shared her how-to’s on Facebook). Note that you need to scroll through the pictures to see the directions and they are in reverse order…but you will get the idea! If you are not on Facebook, I’ll share some directions below.

You will need the following:

  • 1 sheet of 12” x 12” background paper A
  • Twelve 2” x 2” squares of paper
    • Six with a distinct pattern (e.g., palm fronds on Jacks example above). Note that Jacks points out you can cut all six from a mat pack card, if desired.
    • Three with a more subtle pattern or plain (e.g., pink tone-on-tone on Jacks example above)
    • Two with a darker or different print or plain (e.g., navy print on Jacks example above)
  • Four 12” x ½” framing strips OR additional sheet of 12” x 12” background paper B (navy in Jacks example above)

STEPS

  1. Trim ½” off the side and top edges of your background paper A. Resulting page is 11.5” square.
  2. Create frame one of two ways. 1) Adhere background paper A to 12” x 12” sheet of background paper B OR 2) Adhere the four strips of background paper B to the back of background paper A so that ¼” shows on each side on the front. Your whole page should be 12” x 12” square.
  3. Layout your twelve 2” x 2” squares as shown in the samples above. Do not adhere to the paper. Make sure you like the direction of the patterns.
  4. Lift your squares one at a time and use the corner rounder on the TOP LEFT and BOTTOM RIGHT corners only (each resulting Rounded Square should have two round and two square corners).
  5. Put each Rounded Square back on the layout in the correct position after you punch them. Note that the rounded edges should be on the TOP LEFT and BOTTOM RIGHT corners of each Rounded Square when you put them in the layout.
  6. Adhere the Rounded Squares, starting in the corner and leaving a scant 1/8” between the Rounded Square and the side of background paper A. Pay attention to the pattern of colors so they are similar to the samples above.
  7. Time to embellish some of the Rounded Squares! You can use bits of border punches, layered embellishments, stickers, flowers, or other embellishments. Be sure to check out Meggan Jacks’ ideas on Facebook.
  8. If you like the three-photo layout on the examples, cut three 5″x4″ mats or three 4″x4″ mats.
  9. Add embellishments or title as desired.

Some ideas:

  • This would make a great title page for an engagement or anniversary (pics of the bride and groom on the bottom and top corners and a pretty title in the middle) or a vacation (great pics of the travelers on the corners and title in the middle).
  • Some of the Rounded Square can be photos! Consider face shots in some of the spots.
  • Trim your photos as Rounded Rectangles or Squares to add to the mats!
  • Want a two-page spread? Consider moving the bottom right cluster of Rounded Squares to the opposite page.

LAST NOTES AND INFO…

Be safe, be happy, and…be scrappy!

Marsha

Corner Rounder Roundup Part 1: Simple Border

The humble corner rounder. It was probably one of the first tools you purchased if you have been scrapbooking for many years. If you are a new scrapbooker, you may have wondered, “Should I get one of those?” It is most often used for rounding the corners of photos or mats, but it can be a great tool to make some easy borders and layouts!

Creative Memories Two-Way Corner Rounder

In March 2021, Scrappin’ Circle friends from the U.S. and Canada joined me for a Zoom crop where we focused on using a corner rounder punch (CRP) and paper scraps (bash your scraps!) to create layouts, borders, and embellishments. I received lots of requests to share what we did, so I’ll be writing several blogs with directions so you can make them, too!

First, I want to give credit where it is due. These ideas were not developed by me but were kindly and publicly shared by their creators/designers. See below for those credits AND links to original sources. I encourage you to “follow” these amazing designers at their websites or Facebook groups. My contribution was to gather these corner rounder ideas together as a group.

Materials note:  For ALL the Corner Rounder Roundup projects, you can use:

  • Any corner rounder. You don’t have to have a two-way corner rounder that also cuts indents on corners.
  • Either two-sided or one-sided printed papers.

Bash Your Scraps CRP Border

This is a super-simple border from Creative Memories. Thanks to Betty McConnell for pinning this on her CM Corner Rounder Ideas Pinterest page. You can make with either 1.5” or 2” inch squares of paper. The first two examples above used 2″ squares but I like the third example using 1.5” squares because it leaves some space between your “flowers” along the edge of the page. The directions below are for 1.5” squares.  If you want to Bash Your Scraps, look in your scraps bin for 1.5” wide strips of paper OR with 3”x3” squares of paper. A 1.5” x 12” strip will make EIGHT 1.5” squares. A 3”x3” square of paper will make FOUR 1.5” squares.

You need to cut:

  • Eight 1.5” squares of one patterned paper
  • Four 1.5” squares of a second patterned paper (OR of the reverse side if you are using a two-sided paper)

Step 1: Using the corner rounder, trim (round) two opposite corners on each square. The resulting piece should have two rounded corners and two regular right-angle corners (see, for example, the leaf print in the bottom left corner of the picture below). IF your pattern is directional (stripes or one-way pattern), you may want to do Step 2 below BEFORE you trim the corners so the pattern looks the way you want. See the stripes on the Creative Memories example in the pictures above.

Step 2: Lay the first four pieces (see pink ones in the picture below). Note that all of the pointed (non-rounded) corners are on the outside or inside of the flower.

Step 3: What should you do with the middle? Here are some ideas!

  • Punch a small circle to serve as the center and glue in place with or without a foam square underneath to add dimension
  • Use a stick-on embellishment such as a pearl, rhinestone, flower, sticker, etc. Use foam square as desired.
  • Add a “stem” as T. Perper did in her example above.
  • Use the “indent” part of the corner rounder to punch a hole in the middle of your flower…note that we found these hard to align to create a perfect circle!
  • Add a title to your top flower.

Want a two-page spread? Consider making one more “flower” add put it in the outside top or bottom corner of the opposite page. Done!

Last notes and info…

Be safe, be happy, and…be scrappy!

Marsha

Time for National Scrapbook Day!

May 1 is National Scrapbook Day, a day to celebrate all we do to preserve our memories through photos, video, other media, journaling and careful preservation of media and memorabilia. Creative Memories was instrumental in establishing NSD in 1996.

Did you know scrapbooking dates back to the 15th century? And that, in the 18th and 19th century, scrapbooking (then called “friendship albums”) encouraged young women to write about and annotate their lives. You can read more about the history of scrapbooking on Wikipedia, although the article does not describe the dramatic increase in 2020-2021 in scrapbooking due to social distancing during the pandemic.

I attended the Creative Memories (CM) National Scrapbook Day 2021 preview webinar last week. With 1,000+ CM Advisors on the call, it was quite a crowd! The theme this year is “Let the Shenanigans Begin!”

With a single Project Recipe Kit, you will be able to make BOTH of the layouts below!

What else will be available? In addition to the beautiful papers and embellishments used in the layouts above, you can order additional cardstock, reversible laser cuts, a new shamrock recipe template, a beautiful mint green shamrock embossed album cover, foil embellishments, and digital versions of the materials. And, if you buy a bundle, you get a free booklet of great layouts!

Let’s celebrate!

All the great materials above go on sale March 1; you can order through my link: https://www.creativememories.com/user/MarshaSC .

I will be hosting an NSD Zoom crop (date TBA) to show how to use the materials for the NSD layouts and more. Be sure to follow my Facebook page (Marsha’s Scrappin’ Circle) or send an email to me to be added to the email list so you get early notice!

As always, I would welcome your order through my CM page. Contact me at marshamatyas@gmail.com for more info.

Be safe, be happy, and…be scrappy!

Marsha

Virtual Crops? Try it! You’ll Like It!

Are you tired of social distancing? Do you miss getting together with friends to work on your scrapbook, make some cards, or do other crafty projects? Or perhaps you have always worked alone on your craft projects…it’s too much hassle to pack everything up to go to an evening, day or even weekend event. For all the above, I highly recommend trying a “virtual crop” or “virtual crafting session.”

What is a Virtual Crop?

Due to the pandemic and the need for social distancing, you have probably become familiar with virtual (online) meetings for business meetings, doctors’ appointments, religious services, visiting family and friends, and even attending major events such as weddings. It’s a simple principle: You receive an email that includes a link (hyperlink) that you click to join the meeting. Your computer might have to install a little program as the meeting opens but soon you are connected and face-to-face with your colleagues, family, doctor, etc. Virtual crops use the same technology but instead of your doctor, you will see live video of other scrapbookers ready to welcome you to the crop!

Sharing what we learned at a small crop.

Hints

  • If your computer pops up a box that asks whether you want to test your microphone and audio, do it. This assures that you will be able to hear and speak during the virtual crop.
  • You may receive a message that you are “waiting for the host” to let you into the “room.” This is normal…it allows the host to make sure that non-crafters don’t join the virtual meeting.
  • If the host doesn’t admit you to the room in a few minutes, feel free to email or text her/him to say that you are in the waiting room.
  • If you enter the virtual crop and can’t hear or see people, “leave” the meeting and try entering again. Remember that this software is handling many thousands of people at the same time!

What happens next?

Once you have joined the virtual meeting, be sure to turn on your microphone and, if possible, your camera. Everyone likes to see everyone else…don’t worry about how you look. Half the group is probably in sweat pants or leggings and you may see some PJ’s in the morning! Next, you introduce yourself (or the host of the crop introduces you)…very informal!

“Hi! I’m Marsha from Maryland. I’ve been scrapbooking for about a year. This is the first time I’ve done one of these virtual crops so let me know what I need to do.”

Feel free to greet friends you know.

Is there an agenda?

The host often sets an agenda. Listed below are common agenda items you might find at a virtual crop. Note that all of these are OPTIONAL; if you want to simply work on your crafts or just watch, that is perfectly fine!

  • “How-to”: The host demonstrates how to create a page layout, make a border or embellishment, use a new tool, etc.
  • Showcase new materials or tools: If the host is, for example, a Creative Memories consultant, she/he may show pictures, videos, or demonstrate new papers, embellishments, punches, etc.
  • Stretch break: You may be encouraged to get up, stretch, and take a walk.
  • Discussion topic: The host may lead a discussion on setting goals for the year, what you put on the front and back pages of your albums, how you plan your albums (e.g., annual, vacations, major events, birthdays, etc.). You may be encouraged to “show and tell” examples from your scrapbooks.
  • Drawings and games: There often is a tally sheet or bingo sheet where you mark off things you accomplished at the crop. Accomplishments can earn you prizes (paper, embellishments, etc.).

Do you have to be there the whole time?

For a short crop (1-3 hours), you might be expected to attend the whole thing. But for longer crops (all day, 12 hour, etc.), hosts will expect you to come and go as you wish. Some crafters watch the schedule and show up for the demonstrations they are interested in and then leave. ALL of that is acceptable unless the description of the event says attendees are expected to attend for the whole event. That is very rare.

What happens if I get disconnected?

It happens. Or, more often, everything slows down or locks up on your virtual call. Simply “leave” the meeting or reboot your computer and re-enter the meeting the same way you did the first time. If the host’s computer locks up, give him/her a few minutes to reboot and then try to come into the call again. If there is continued trouble, be sure to check your email or text for communication from the host.

Can I get anything done?

YES! You can work throughout the crop on your own work. You also can say, “Hey, what do you think…is this better with the blue paper or the red paper” while you hold up your work in front of your camera. You can ask, “Has anyone ever done X or tried to use Y or know how to get glue off an old photo?” And you will get lots of ideas and answers. And you will make new friends. Here are comments from an old friend who attended my virtual crops last year and from a new friend I made through the virtual crops last year.

I have been scrapbooking for over 20 years. I love going to small crops with close friends and large crops with people who become my friends!  When Covid-19 hit, all the crops that I had planned to participate in were canceled. When Marsha said she was going to do crops on Zoom I thought, “How will that happen?”  I wasn’t sure how they would take place; would we be able to communicate with each other, would we be able to see each other’s work, isn’t it weird to have all these people looking at you, etc.  My first Zoom crop was sooooo exciting!  I was able to get several pages done and it was so neat meeting people from all across the USA!  I even got to see friends that I would usually crop with! We talked with one another, asked questions, got suggestions for layouts, and there were times when it was quiet – it wasn’t weird at all!  I enjoy learning new layouts and Marsha is very patient when it comes to teaching them!  I have completed several albums during the Zoom crops, and I have been able to organize my photos which makes my scrapbooking so much easier.  If you love to scrapbook, you need to try a Zoom crop!!

Deb N., Maryland

Marsha’s Virtual Crops literally saved me during the pandemic. I know that statement sounds extreme, however, I believe it is true. As someone who at times struggles with anxiety, having our Virtual Crops gave me a focus, a valuable connection with others and a feeling of accomplishment. Most importantly it simply gave me something that brightened my week – I look forward to our Saturdays. Now I’m off to prep for our next crop and there is a smile on my face!”

Terri P., Maryland

What is the cost?

Except for some training or special crops where you receive a lot of training or materials, virtual crops are free. My crops are free.

How do I find a virtual crop?

Of course, you are always invited to attend my crops! These are always posted on my Facebook page and in the Facebook feed at the right side of this page. Also, sign up for my biweekly email update for both crop announcements and info on new Creative Memories resources, and other vendor events. Email me and ask for the Scrappin’ Circle Newsletter.  

You also can search for events at the Creative Memories site. You can search by date, zip code, or state. Be sure to click “virtual events” under the search box. Remember that, for virtual events, the LOCATION does not matter…so use the “search by date” box.

What are you doing at the Jan 16 crop?

  • A quick fold over layout that would be great as an album title page
  • A big circle page with “how-to” on creating a woven pattern circle
  • A Noreen Smith layout that can be done both simply and with greater embellishment
  • A discussion of goal-setting for 2021
  • And a stretch break and prize drawing, of course.

Email me for the Zoom link at marshamatyas@gmail.com !!

As always, I would welcome your order through my CM page. Contact me at marshamatyas@gmail.com for more info.

Be safe, be happy, and…be scrappy!

Marsha

Presto! 3 Cuts to a Great Layout!

“I love Noreen Smith’s 1-2-3 layouts,” I overheard the lady say at a crop several years back. Her friend responded, “Yes! They are so easy and so pretty!” I couldn’t resist asking, “Who is Noreen Smith and what is a ‘1-2-3 layout’?” I’m so glad I did! When you are staring at an empty page (or pair of pages) and need to do SOMETHING with the 6-8 pictures you have for an event, Noreen Smith’s wonderful layouts are like having a magic wand in your pocket!

Noreen is a Creative Memories Advisor, educator, scrapbooker, blogger, and author. You can read more about Noreen at her website. She offers courses through her website and has lots of YouTube video tutorials and a great blog where you can always get a new idea. She also is the developer of the 1-2-3 Scrapbook Method which is what I want to share with you today.

1-2-3 Scrapbook Layouts

Noreen has created a whole library of 2-page and 1-page layouts where you use 1 sheet of double sided paper and two sheets of card stock, make THREE cuts of the double sided paper…and end up with a wonderful two-page layout ready to mount 6-7 pictures like this:

Lovely wedding: Don’t believe that you can make the page layout with 3 simple cuts? Here is how it’s done:

In this case, matching embellishments and mat packs helped to speed up the final embellishment. Note that, even for this quite formal event, she didn’t need to mat each picture because the 1-2-3 layout provides full or partial matting behind most pictures.

Happy holidays: Here is another example…this video shows how to make both a Christmas and a Halloween layout. Remember that these always start with a template that can be used for LOTS of events, holidays, etc.

Head for the Border Maker!  How about using almost the same layout with a quick punch of your border maker to make a nautical theme?

How to do it? Here is the video and the blog.

Do I use Noreen Smith’s great 1-2-3 cut method? Sure do! Here are a few examples of my 1-2-3’s…thanks, Noreen!

IMG_5269(Edited)IMG_5270(Edited)

ALL of these took only 2 sheets of card stock, one sheet of double-sided paper, and three cuts. Well, I have to admit that the last one (Go Boilers) used 2 sheets of single-sided patterned paper (the tan/cream dots) and one sheet of black card stock. I made the three cuts on the card stock because I wanted to use the tan paper and it was not double-sided. See how adaptable these layouts are?

Want to see more? Check out Noreen’s Page and be sure to sign up for the FREE membership library that gives you access to 1-2-3 layouts and lots more! Use this link:

TRY at LEAST one 1-2-3 layout…you will want to do more! Share them below or on my Facebook page!


CREATIVE MEMORIES PRODUCT UPDATE

Disclosure: I’m using the second half of my blogs to share product info in order to reach the most people without asking non-Facebookers to join Facebook!  I am a Creative Memories Advisor and, should you place an order through my page, I earn a percentage of the sale. However, I only recommend the products that I think are really wonderful and would and do use myself.

NEW RELEASES TODAY!

Lumberjack stickers: These are GREAT for Father’s Day but they are selling out FAST! Lumberjack Stickers have three mini sheets (5″x8.25″) of dad-and-me-themed stickers for $6.50. It features icons like lumberjacks, oxen, fish, leaves, antlers and campfires, as well as sayings like “Best buds,” “My hero” and “Happy Father’s Day,” and includes complementing border stickers.

Love Each Other Album Cover: For a limited time only now through July 31, you can get the exclusive 12×12 Ocean Blue Love Each Other Album Cover featuring a foiled heart design from the Love Each Other Theme Pack. All profits for this album cover will be donated to World Vision.

Love Each Other Theme Pack: It’s BACK! This kit includes four designer papers that spread love and positivity with patterns like hearts, polka dots and lined paper to share your stories. It also features complementing stickers that remind us that we always have been – and will be – there for each other, with icons like stethoscopes with hearts and people exchanging social-distancing greetings. There are also uplifting sayings like “Stay Positive Stay Brave” and “Always staying connected.” Like the album cover above, all profits for the Love Each Other Theme Pack will be donated to World Vision.

Power Project Folders: They’re BACK! Secure your scrapbooking materials in our clear poly multi-pocket Power Project Folders. Fits all your favorite 12×12 designer papers and cardstock, slide-in packs, sticker strips and more.

Vitamin Sea overview

The NEW! VITAMIN SEA COLLECTION has an array of tropical scrapbook supplies. This collection captures all your sandy moments and sets a seaside scene for photos of tropical vacation getaways, ocean adventures, beach and pool days and more. Check out the movie overview here . And here are a few pictures!

This slideshow requires JavaScript.

  • a beautiful turquoise ALBUM COVER with a hibiscus flower design in white matte, apple and teal foil and BOOKCLOTH ALBUMS in coordinating colors;
  • TWO PAPER PACKS (designer paper and tone-on-tone) AND matching CARD STOCK;
  • a great mat pack with cards for titles, journaling, and matting pics/embellishments;
  • Stickers with borders, titles, sea life, plants, trees, and flowers;
  • EMBOSSED tropical leaves…useful for this pack and LOTS of other places;
  • LASER CUT BORDERS of palms, hibiscus blossoms, shells, sunglasses, etc.;
  • Fast2Fab pages that make it SUPER easy;
  • NEW Border Maker punch cartridge – Kissing Fishes…so cute!
  • New Border punch (stand alone) – seashells…use it in layers or alone

If you would like to order, please use my link! Thanks!

Virtual Events on the Horizon!

Creative Memories is hosting additional Virtual Crops in the coming months: July 10-11, and August 14-15. For more info, join the CM Facebook Virtual Crop page at https://www.facebook.com/groups/CreativeMemoriesVirtualCrop/

As always, I would welcome your order through my CM page. If you order through my page in June, you can get a shipping rebate up to $20. Contact me at mlmat@comcast.net for more info.

Be safe, be happy, and…be scrappy!

Marsha

Hearts Afire!

Wow…everyone is making heart layouts! This “heart beat” started in February (no surprise there) but the creativity just keeps coming! And the good news is that they are really SIMPLE. Did you ever play with tangrams? You can make LOTS of shapes with triangles and squares (as we have seen in my previous posts). Add circles and you get an amazing array of options! Today…let’s make HEARTS!

Take a look at some of the wonderful things you can do with this hearts layouts!


Materials: All you need is one 12 x 12 sheet of card stock and one 12 x 12 sheet of double-sided paper. If you would like to make the two-page layout above, have two sheets of card stock ready. For the first time you make this layout, it is best to have a print that is NOT one directional (e.g., no stripes, arrows or columns all in the same direction). A paper cutter and circle cutter is really helpful for this page but you could certainly do it with a ruler, scissors, and a can or jar.

Pam Giganti created a WONDERFUL video showing how to make one of the large heart layouts. Watch and learn! Pam makes it really easy!

I wanted to use the heart as a cover page for the part of my album describing a Disney visit in the fall. But the space in the middle didn’t fit well with the 5 x 7 picture that I had printed for the page. SO…I made a page using larger circles (nearly 6 inches) and trimmed the picture to be the point of the heart. I still have a little adjustment to do but what do you think? This layout is really adaptable!

I also wanted to make the little heart border that Pam describes in the video. What could be more perfect than my pages for the Disney princess parade! I happened to have a great purchased embellishment of the castle complete with a tiny Tinkerbell. I think the heart borders worked well…even though I clearly am not a great freehand heart-cutter. Good thing I’m not a cardiac surgeon!

This slideshow requires JavaScript.

Have you made some heart layouts? Share them below or on my Facebook page!

Disclosure: I’m using the second half of my blogs to share product info in order to reach the most people without asking non-Facebookers to join Facebook!  I am a Creative Memories Advisor and, should you place an order through my page, I earn a percentage of the sale. However, I only recommend the products that I think are really wonderful and would and do use myself.

NEW RELEASES TODAY!

fun in the sun collection

Fun in the Sun!

Designer paper has patterns with “striped beach towels and toys, sunglasses, starfish, seashells and water waves in a palette of hot pink, vivid violet, aqua blue, periwinkle, tangerine and banana yellow. It’s perfect for photos of the sweltering days by the cool refreshing water, backyard barbecues and more.” Check out the fabulous purple album cover with splashes of summer colors along with mat pack, stickers, and embellishments. What a great collection! Check out the whole bundle here.

A Festive Fourth of July!

Inspired by all-American barbecues, Fourth of July family get-togethers and pride for the USA, this collection features designer scrapbook paper, stickers, a beautiful red album embellished with fireworks, and new firecracker punch (below). Patterns feature “stars and stripes, firecrackers, fruit and red, white and blue popsicles in a palette of strawberry red, blueberry and denim blue, navy and tan. You’ll love it for your photos of festive celebrations, the Fourth of July, saluting military personnel and more.” Check it out here.

love each other

It will be back! I’m so very sorry…CM released a Love Each Other Theme pack that was gone so fast I didn’t even get one! BUT it will be back later in the summer and I will post ASAP when it does!

Thinking about becoming an Advisor?

There is a new 3 step program to give you more rewards as a new CM Advisor. I would be delighted to serve as your upline Advisor! Drop me an email, give me a call, or text me…I would be happy to give you more info.

Virtual Events on the Horizon!

Creative Memories is hosting additional Virtual Crops in the coming months: June 12-13, July 10-11, and August 14-15. For more info, follow the CM Facebook page at https://www.facebook.com/creativememories/ 

As always, I would welcome your order through my CM page. If you order through my page in June, you can get a shipping rebate up to $20. Contact me at  for more info. 

Be safe, be happy, and…be scrappy!

Marsha